In the world of Los Angeles home improvement, nothing spells trouble quite like the sight of a crack zigzagging its way through a brick or concrete wall. Yet, as daunting as it seems, taming these unsightly veins is well within DIY reach. This bustling city, where the homes carry stories of sun and seismic unrest, demands a simple solution to wall fissures—an approach both practical and accessible to homeowners eager to preserve their cherished abodes.
Brief summary: Discover the straightforward method to repair cracks in brick and concrete walls, with practical tips and expert insights tailored for Los Angeles homeowners. This article guides you through the materials, techniques, and considerations needed to achieve a flawless finish, maintaining your home’s aesthetic and structural integrity.
What You Should Know About Wall Cracks
Before jumping in with trowel and mortar, it’s essential to grasp the why behind these wall fractures. Often appearing after seismic shifts or as a result of moisture expansion, these cracks can signal anything from a minor aesthetic blemish to a more serious structural issue. Understanding this context is crucial for effective repair.
Let’s face it, Los Angeles homeowners are no strangers to the earth moving beneath their feet. As natural occurrences like tectonic thrusts prompt wall stress, it sets the stage for home maintenance challenges. Many find themselves perplexed by these breaks, not only in aesthetics but in peace of mind.
Indeed, those monitoring home aesthetics mustn’t overlook the implication of moisture. As the experts say, “It’s crucial to address any possibility of water damage early, as prolonged exposure can exacerbate structural problems.”
According to the National Association of Home Builders, “Regular inspection for signs of moisture is imperative to prevent long-term damage.”
With the groundwork set, we can now delve into the effective steps that shield your property from these common foes. After all, prevention and timely action pave the way to longevity and safety for your treasured domicile.
Materials and Tools: A Practical Inventory
Diving into the repair process sans the correct toolbox is like surfing Malibu waves without a board—doomed to disappoint. Proper equipment streamlines the repair, ensuring you meet the challenge head-on. Here’s your roadmap to acquiring the essentials.
The Foundation of Success
Start by selecting high-quality patching materials. Options range from pre-mixed concrete for small holes to more complex compounds for extensive fissures. Consider your wall type and crack size; these nuances tailor your approach. A standard toolkit for any crack crusader usually includes trowels, brushes, safety gear, and a reliable ladder.
For those seeking truly professional results, incorporating bonding agents can enhance adhesion, while a trusty chisel removes loose debris. Don’t forget the importance of surface preparation, a crucial step often relegated to an afterthought.

As many local homeowners notice, having these items at the ready not only conserves time but bolsters confidence when tackling these sizable projects. So, stock up your repair kit and set your sights on seamless results.
Concluding this inventory appraisal, remember the principle: the right tool for the right job maximizes efficiency and minimizes frustration.
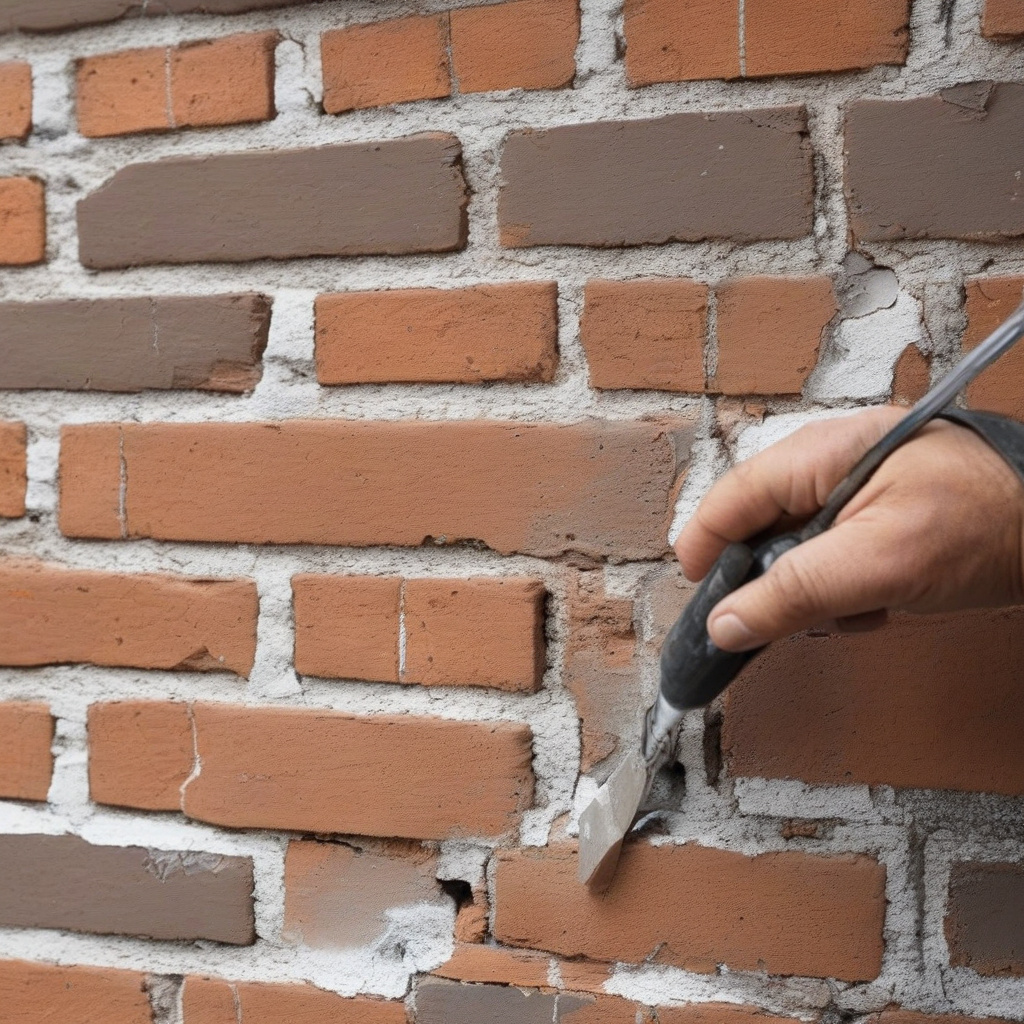
Step-by-Step Crack Repair Process
Let’s embark on a comprehensive guide to rejuvenate your walls. Whether it’s brick or concrete, adhering to structured steps ensures durability and visual appeal. Here’s how to transform that crack into a mere memory.
- Preparation: Clear the surrounding surface area. Use a chisel for cleaning out loose material.
- Cleaning: Comprehensively clean the crack using a brush, ensuring all dust and debris are removed.
- Patching: Apply the chosen compound, ensuring you spread evenly with a trowel.
- Smoothing: Level the surface with additional strokes for a flush finish.
- Curing: Allow adequate time to dry, avoiding disturbance during this period.
Each phase is essential, and skipping could compromise the entire project. Embrace patience and precision as your allies in safeguarding your investment.
Ultimately, with these steps diligently followed, your home shell stands not only repaired but ready to defy future forces conspiring against its facade.
Comparing Repair Techniques and Materials
In contemplating brick versus concrete, each presents unique repair characteristics. Here, we break down how these materials differ in restoration approach, cost, and longevity.
| Attribute | Brick Solutions | Concrete Solutions |
|---|---|---|
| Cost | Moderate to high | Low to moderate |
| Ease of Application | Skill-intensive but durable | Simpler and quicker |
| Longevity | High maintenance | Dependable |
In essence, picking the right repair path involves weighing financial considerations against desired longevity and maintenance ease. Evaluate your priorities and proceed accordingly, knowing each step brings peace of mind.
Expert Insights: When DIY Might Falter
While DIY spirits fly high, there come circumstances where professional intervention is prudently warranted. As ever, discernment ensures both safety and quality. Recognizing these moments is the essence of wise home stewardship.

For instance, extensive damage or repeated repair failures signal the need for expert eyes. Their practiced hands deftly maneuver where amateurs might second-guess. A seasoned artisan translates complex problems into simple solutions with enviable ease.
Moreover, choosing the right materials involves navigating the labyrinth of siding options. Explore all about vinyl siding and its applications as a revelation for many homeowners, blending modern design with practicality.
An industry expert suggests, “Remodeling is as much about knowing when to step back as it is about stepping up to the challenge.”
Conclusively, when a DIY route loses its luster, calling in reinforcements can save time and headaches while preserving your home—to pass onto future generations.
Conclusion: Wrapping Up and Moving Forward
Repairing cracks, while a seemingly daunting endeavor, is absurdly approachable with the right mindset and resources. This undertaking, with all its meticulous demands, develops more than just your walls—it expands your DIY credentials and paves the way for undertaking larger projects.

Moreover, regular maintenance accentuates a home’s allure and market value. It’s akin to ensuring your walls become part of an evolving tapestry, safeguarding cherished memories framed within them. Continual improvement serves as an unspoken narrative cut within your home’s foundation.
Reflecting on construction wisdom: “Investment in maintenance is an investment in legacy.”
As we turn a new chapter, let’s recognize the multifaceted value of such repairs—balanced between aesthetics, financial prudence, and cultural preservation. Embrace each project as not just a chore, but a journey enhancing what matters most: a home’s heart and soul.
- Understanding wall cracks is key to effective repair.
- Proper materials and tools ensure success.
- A step-by-step guide simplifies complex repairs.
- Know when to call professionals for best results.
- Regular maintenance preserves your home’s value.
“`html
FAQ
What is the best method for patching cracks in brick and concrete walls?
In real renovation projects, it’s essential to assess the type and size of the cracks before deciding on the repair method. For minor cracks, using a concrete patching compound is often effective. This method involves thoroughly cleaning the area to remove debris and then applying the compound carefully. Many experts point out the importance of ensuring that the compound is compatible with the specific type of brick or concrete to prevent future damage. For more extensive repairs, consulting with a specialist may be necessary.
How can I choose the right product for repairing cracks?
Choosing the right product for repairing cracks depends heavily on the material of your walls. In single-family homes, especially those built before the 1980s, cracks in brick require mortar-based products, while newer concrete walls benefit from acrylic latex compounds. Homeowners frequently underestimate the necessity of reading product labels for compatibility and application instructions. It’s always wise to opt for high-quality materials, as they provide better long-term results.
When is it necessary to involve a professional in patching wall cracks?
Involving a professional in patching wall cracks is crucial when the cracks are wide, deep, or recurrent. In older properties undergoing renovation, large structural cracks can be signs of foundational issues, which require expert assessment. Many renovation experts advise that if a crack is wider than 1/4 inch, it’s a red flag indicating the need for professional intervention. Attempting DIY in such cases might lead to further complications down the road.
What are the typical mistakes homeowners make when patching cracks?
Typical mistakes include not properly cleaning the crack before applying patching material and failing to choose the appropriate product. In real renovation scenarios, this negligence leads to poor adhesion and the reappearance of cracks. Another common error is not allowing enough cure time before exposing the repaired area to stress. Patience is key; many overlook this aspect, resulting in repairs that don’t hold up over time.
Are there cost considerations to patching wall cracks on your own vs. hiring a professional?
The cost-saving appeal of DIY repairs is clear, but they often come with hidden expenses if not executed correctly. Material costs for DIY projects are lower, but without experience, you risk improper repairs that lead to further damage. On the other hand, professionals bring expertise and quality assurance, but at a higher price point upfront. For more nuanced situations, you might reach out to get a quote from a contractor in your area by contacting renovation specialists easily through this contact form.
What are the pros and cons of using epoxy to repair cracks in concrete walls?
Epoxy is a popular choice for concrete crack repairs due to its strong adhesive properties and durability. It forms a watertight seal that effectively prevents moisture ingress. However, in real homes, applying epoxy can be challenging—requiring precision in the mixing and application process. Moreover, while effective for non-moving cracks, it’s less suited for cracks subject to regular stress. Weighing these factors can help homeowners decide if epoxy is the right solution for their specific needs.
How do seasonal changes affect crack repairs in brick and concrete walls?
Seasonal changes can significantly impact the effectiveness and timing of crack repairs. In areas like California, where temperature fluctuation occurs, the materials used in repairs might expand or contract, thus affecting their stability. Many experts recommend scheduling repairs during moderate weather conditions to allow the materials to set and cure properly without temperature-induced stress. Ignoring these factors can lead to cracking reoccurrence or expansion.
How can homeowners maintain wall repairs to ensure longevity?
Maintenance is key to ensuring longevity in wall repairs. Regular inspection of brick and concrete surfaces for new signs of cracks or wear should be part of a homeowner’s routine. In practice, sealing the wall surfaces helps protect against water penetration—a common cause of crack expansion. Additionally, addressing any signs of moisture build-up quickly can prevent small issues from becoming major structural concerns. Homeowners should also consider repainting concrete walls with a waterproof coating every few years for extra protection.
“`